


Read Time 6 Minutes
Read Time 6 Minutes
Read Time 6 Minutes
You already know your open C, A, G, E, and D major chords. (If not, start here.) But did you know those five shapes are the key to playing anything in any position on the neck?
That’s the CAGED system — and once it clicks, you’ll never feel lost above the 5th fret again.
What Is the CAGED System?
Here’s the big idea: every open chord shape can be moved up the neck. When you slide an open chord shape up and barre across the strings, you get the same chord in a new position. The five open shapes — C, A, G, E, and D — tile across the entire fretboard in a repeating sequence.
That means for any single chord, there are five ways to play it, each based on one of those familiar open shapes.
The Five Shapes as Moveable Frameworks
Let’s map out each open shape. The R marks the root note — this is the note that names the chord and the anchor you’ll use to move the shape anywhere.
E Shape
The one most guitarists learn first as a barre chord.
Open E Major:

e|--0--
B|--0--
G|--1--
D|--2--
A|--2--
E|--R--  (open = E)
Slide it up to the 5th fret and you’ve got an A major:
A Major (E shape, 5th fret):

e|--5--
B|--5--
G|--6--
D|--7--
A|--7--
E|--R--  (5th fret = A)
You already do this every time you play an F barre chord. That’s just the E shape moved up one fret.
A Shape
The second most common barre chord shape.
Open A Major:

e|--0--
B|--2--
G|--2--
D|--2--
A|--R--  (open = A)
E|--x--
Move it to the 3rd fret for C major:
C Major (A shape, 3rd fret):

e|--3--
B|--5--
G|--5--
D|--5--
A|--R--  (3rd fret = C)
E|--x--
The root is on the A string, so that’s your anchor for sliding this shape around.
C Shape
This one feels awkward at first — stick with it.
Open C Major:

e|--0--
B|--1--
G|--0--
D|--2--
A|--R--  (3rd fret = C)
E|--x--
Moved up to D (5th fret root on A string):
D Major (C shape, 5th fret):

e|--2--
B|--3--
G|--2--
D|--4--
A|--R--  (5th fret = D)
E|--x--
In practice, many players grab just the top 3-4 strings of the C shape rather than the full barre. That’s totally fine — partial shapes are part of the game.
G Shape
The trickiest to barre. Think of it as a framework for finding notes rather than a chord you’ll barre every day.
Open G Major:

e|--3--
B|--0--
G|--0--
D|--0--
A|--2--
E|--R--  (3rd fret = G)
Moved up to A (5th fret root on E string):
A Major (G shape, 5th fret):

e|--5--
B|--2--
G|--2--
D|--2--
A|--4--
E|--5-- (root, 5th fret = A)
D Shape
Root on the D string — great for voicings on the higher strings.
Open D Major:

e|--2--
B|--3--
G|--2--
D|--R--  (open = D)
A|--x--
E|--x--
Moved up to E (2nd fret root on D string):
E Major (D shape, 2nd fret):

e|--4--
B|--5--
G|--4--
D|--R--  (2nd fret = E)
A|--x--
E|--x--
How the Shapes Connect
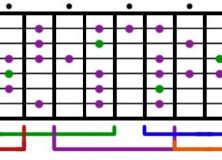
Here’s where it gets powerful. The five shapes link together in a continuous chain up the neck. For any key, the shapes always appear in the same order:
C → A → G → E → D → C → A → G → E → D → ...Let’s see this in action for the key of C major. Each shape covers a region of the fretboard, and they overlap slightly:
C Major — All 5 Positions:

Fret:  0  1  2  3  4  5  6  7  8  9  10 11 12
       |        |        |        |        |
       [C shape]
              [A shape ]
                    [G shape  ]
                          [E shape ]
                                [D shape ]
                                      [C shape...
No matter where you are on the neck, one of these five shapes is right under your fingers. You always know where you are.
Finding the Roots
The key to using CAGED on the fly is knowing where the root sits in each shape:
Shape:    Root string:
──────    ────────────
E shape → 6th string (low E)
G shape → 6th string (low E)
D shape → 4th string (D)
C shape → 5th string (A)
A shape → 5th string (A)
If you know your notes on the 5th and 6th strings, you can instantly find any chord in any CAGED position. That’s only two strings to memorize — not six.
Quick reference — notes on the 5th and 6th strings:
6th string (E):
E  F  F#/Gb  G  G#/Ab  A  A#/Bb  B  C  C#/Db  D  D#/Eb  E
0  1    2    3    4     5    6     7  8    9    10   11    12

5th string (A):
A  A#/Bb  B  C  C#/Db  D  D#/Eb  E  F  F#/Gb  G  G#/Ab  A
0    1    2  3    4     5    6    7  8    9    10   11    12
Beyond Chords: Scales and Arpeggios
Here’s the real payoff. Each CAGED shape isn’t just a chord — it’s a window into the scale.
Take the E shape at the 5th fret (A major). The pentatonic scale wraps right around it:
A Major Pentatonic (around E shape):

e|--5-----7--
B|--5-----7--
G|--4--6-----
D|--4-----7--
A|--4-----7--
E|--5-----7--
       *

* = root (5th fret)
The chord tones sit inside the scale. When you solo, you can see the chord inside the scale pattern — which means you always know which notes will sound strongest over that chord.
Each CAGED position gives you a different pentatonic box. The five pentatonic boxes are the five CAGED shapes. They were the same thing all along.
Putting It to Practice
Exercise 1: One Chord, Five Ways
Pick any chord — let’s say G major. Play it in all five CAGED shapes up the neck:
G Major in all 5 positions:

E shape:  3rd fret barre (you know this one)
D shape:  5th fret region
C shape:  10th fret region
A shape:  10th fret barre
G shape:  open / 12th fret region
Say the shape name out loud as you play each one. This wires the connection between shape and sound.
Exercise 2: Walk a Progression Up the Neck
Play a simple I-IV-V in G (G – C – D) but stay in one area of the neck:
Position 1 (open position):
G: E shape, 3rd fret
C: C shape, open
D: D shape, open
Position 2 (around 5th-7th fret):
G: D shape, 5th fret
C: A shape, 3rd fret
D: C shape, 5th fret
Position 3 (around 7th-10th fret):
G: C shape, 10th fret
C: G shape, 8th fret
D: A shape, 5th fret
The same three chords, but completely different voicings and neck positions. This is how session players and jazz guitarists move fluidly across the fretboard.
Exercise 3: Solo Inside the Shapes
Put on a backing track in A major. Solo using only one CAGED position at a time. Start with the E shape at the 5th fret (the most familiar). Then force yourself into the D shape, the C shape, and so on.
You’ll notice each position has a different character — some are brighter (higher strings), some are warmer (lower positions). That’s not a limitation, it’s a palette.
Common Stumbling Blocks
“The G and C shapes are impossible to barre.”
You’re right — and you don’t have to. Use partial shapes. Grab 3 or 4 strings instead of all 6. The point is knowing where the notes are, not barring every shape perfectly.
“I can see the shapes but I can’t switch between them fast enough.”
That comes with time. Focus on the overlap zones — where two adjacent shapes share notes. Those shared notes are your bridge from one shape to the next.
“I know CAGED but I still can’t improvise freely.”
CAGED is the map, not the music. Once you can see the shapes, start connecting them with slides, hammer-ons, and position shifts. The goal is to eventually forget about the boxes and just see notes.
The Takeaway
The CAGED system gives you five ways to play any chord and five windows into any scale — all based on shapes your fingers already know. It’s not a style or a genre. It’s a navigation system for the fretboard.
Start with one key. Learn all five positions. Then do it in another key. Before long, the neck opens up and those shapes become second nature.
You’ve got the map. Now go explore.
New to guitar chords? Start with The “CAGED” Major Guitar Chords to learn the five open shapes first.